

How To Import Picture Photoshop
Open Multiple Images Every bit Layers In Photoshop
Larn how easy it is to open multiple images at one time into a Photoshop document, with each image placed on its own layer, and how to add more images to the certificate as you demand them!
Whether we're compositing images, creating collages or designing layouts, we often need to load multiple images into the same Photoshop document. And each image needs to appear on its own layer within that document. Simply that's not how Photoshop works when nosotros open multiple files. Instead, each file opens in its ain separate document, forcing usa to move the images ourselves from ane certificate to another.
But there is a way to open multiple images at once into the aforementioned document using a control chosen Load Layers into Stack. And we can add more files to the document every bit nosotros demand them using a unlike control known as Identify Embedded. In this tutorial, I'll show you how both of these features work. Nosotros'll also wait at a few options in Photoshop's Preferences that make placing images into your document fifty-fifty faster. And as a bonus, I'll end things off by blending my images into a unproblematic double exposure effect.
I'm using Photoshop 2020 simply y'all tin can follow along with any recent version.
This is lesson 6 in my Layers Learning Guide. Let'southward get started!
How to load multiple images as layers in Photoshop
Let's get-go by learning how to load multiple images as layers into the aforementioned Photoshop certificate. For that, we use a command called Load Files into Stack. And non only does this command load your images, just it even creates the Photoshop document for you! Here's how to use information technology.
Footstep ane: Choose "Load Files into Stack"
In Photoshop, go up to the File card in the Carte du jour Bar, cull Scripts, and then choose Load Files into Stack:
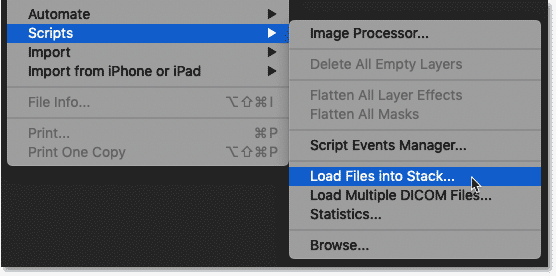
Going to File > Scripts > Load Files into Stack.
Footstep 2: Select your images
So in the Load Layers dialog box, prepare the Use pick to either Files or Folder. Files lets you select private images inside a binder, while Folder will load every image in the folder you select. I'll choose Files.
Then click the Browse button:
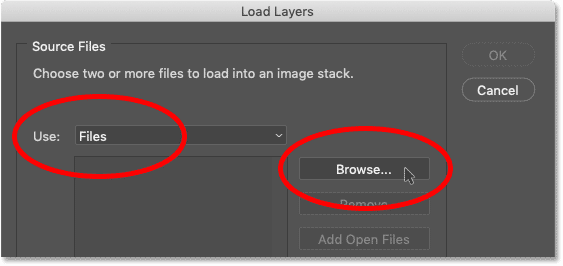
Setting Utilise to either Files or Binder and and then clicking Browse.
Deject documents or local files
If y'all're using Photoshop CC 2020 or later, Photoshop may inquire if y'all desire to load a Cloud document or files stored on your computer. I'll click the On your computer push button:
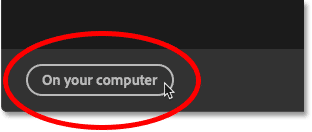
Choosing to load files on my figurer.
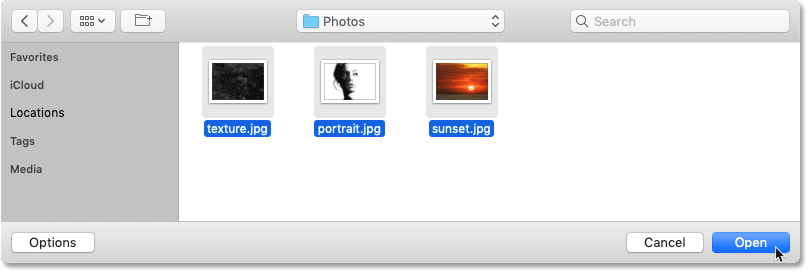
Selecting your images
Then navigate to the binder that holds your images and choose the files you lot need. In my case, I'll select all three images in the folder.
Notice the names of my images. We take "texture.jpg", "portrait.jpg" and "dusk.jpg". Photoshop will use these names when naming the layers, so it'south a good idea to rename your files commencement.
Once you lot have selected the images, click Open:
Selecting the images to load into Photoshop.
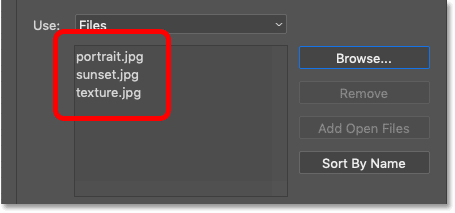
And back in the Load Layers dialog box, the name of each file appears in the listing:
The names of the images that volition be loaded into Photoshop.
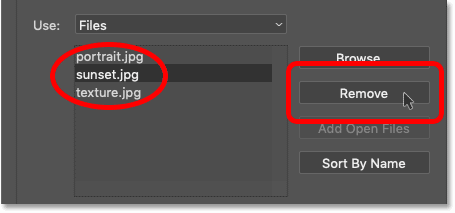
How to remove an image
If y'all selected an image by fault and need to remove information technology, click on its name in the list and and so click the Remove button:
Yous tin can remove any images you don't need.
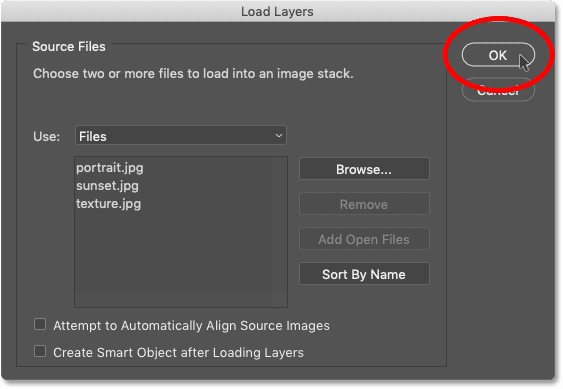
Step 3: Click OK
Go out the two options at the bottom of the dialog box ("Attempt to Automatically Align Source Images" and "Create Smart Object later on Loading Layers") unchecked.
Then click OK to load your images:
Clicking OK to load the files.
Photoshop creates a new document, and after a few seconds, the images are placed into it:
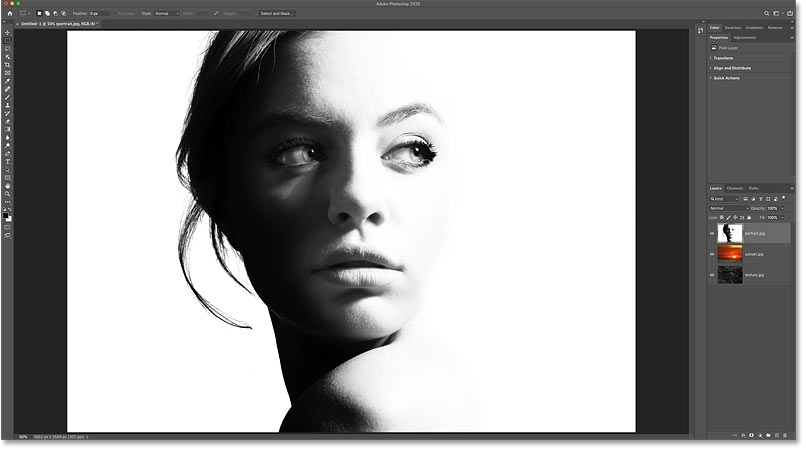
A new Photoshop document is created.
And in the Layers panel, each of your selected images appears on its own layer, with each layer named subsequently the proper name of the file:
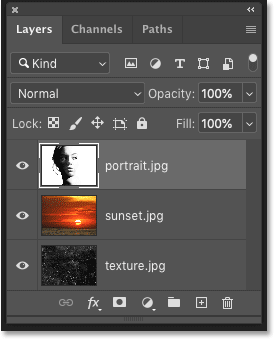
The Layers panel showing each image on its own layer.
You can turn each layer on or off by clicking its visibility icon:
Use the visibility icons to show or hibernate layers.
How to place an image into a Photoshop document
So that's how to create a new Photoshop document and load multiple images into it. Now allow's larn how to add together more images to the certificate using the Place Embedded command.
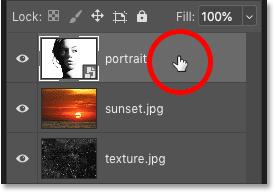
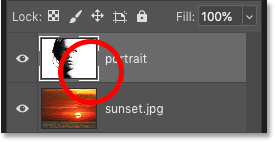
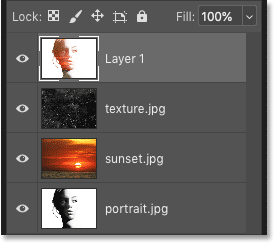
In the Layers panel, I'll delete my "portrait" layer by dragging it down onto the trash bin:
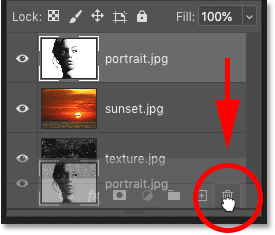
Deleting one of the layers.
Step 1: Choose "Identify Embedded"
To add a new epitome to your certificate, go up to the File menu and choose Place Embedded.
In that location is also a similar command chosen Place Linked which will simply link to the file on your figurer. But to load the image directly into your certificate, choose Place Embedded:
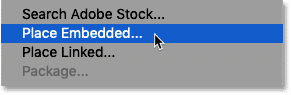
Going to File > Place Embedded.
Step 2: Select your image
Select the epitome yous want to add to the document and then click Place.
I'll choose my portrait image:

Selecting the image to place into the document.
Step 3: Accept and shut Gratis Transform
At present before Photoshop places the paradigm, it first opens the Complimentary Transform command then you lot can resize the paradigm if needed:
Photoshop opens Gratuitous Transform before placing the image into the document.
Just in nigh cases, yous can but click the checkmark in the Options Bar to accept the current size and close Free Transform. You tin can also press the Enter (Win) / Render (Mac) key on your keyboard:
Clicking the checkmark.
The image is placed equally a smart object
Photoshop places the paradigm into the document. Only detect in the Layers console that the epitome appears not equally a normal layer only as a smart object, indicated by the icon in the lower correct of the thumbnail:
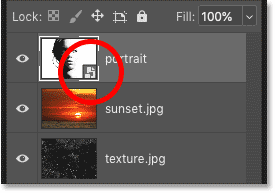
Photoshop places the image as a smart object.
Smart objects are very powerful. Just they too take limitations, and the biggest one is that a smart object is not direct editable.
For case, I'll select the Rectangular Marquee Tool from the toolbar:
Selecting the Rectangular Marquee Tool.
So I'll elevate out a selection effectually the woman'south eyes:
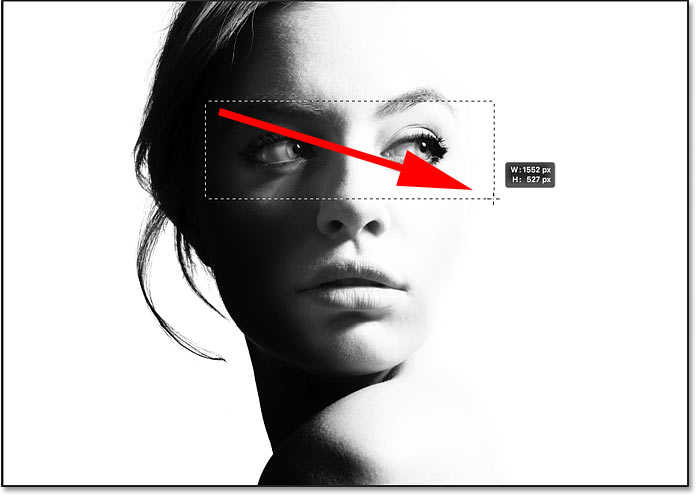
Selecting role of the smart object.
Related: How to utilise the new Object Selection Tool in Photoshop CC 2020
I'll capsize the selection by going upward to the Select menu and choosing Inverse:
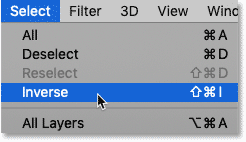
Going to Select > Inverse.
And then I'll delete everything around my initial selection by pressing the Backspace (Win) / Delete (Mac) key on my keyboard.
Only instead of deleting part of the prototype, Photoshop displays a alert that it could not complete my request because the smart object is not straight editable. I'll click OK to close it:
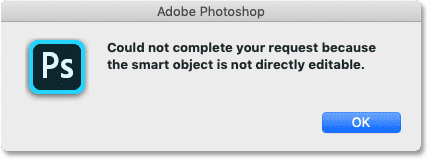
Photoshop could not edit the smart object.
Related: Acquire how to edit smart objects!
How to convert a smart object to a normal layer
So depending on what you'll be doing with the image, a smart object may not be what you desire. In that case, you'll demand to catechumen the smart object dorsum into a normal layer after yous've placed information technology into your document.
To do that, right-click (Win) / Control-click (Mac) anywhere in the empty gray area abreast the smart object'south name:
Correct-clicking (Win) / Control-clicking (Mac) in the empty area.
And and so choose Rasterize Layer from the menu:
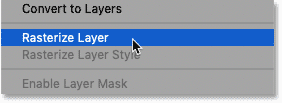
Choosing the Rasterize Layer control.
The smart object icon disappears from the thumbnail, and we at present take a normal pixel layer:
The smart object has been converted to a pixel layer.
If I printing Backspace (Win) / Delete (Mac) on my keyboard, this time Photoshop deletes the pick as expected:
The selection was deleted later on converting the smart object to a pixel layer.
How to make placing images into Photoshop faster
So at present that we know how to place an prototype into a document, let's look at a few options in Photoshop's Preferences that tin can help you place images even faster.
To open the Preferences on a Windows PC, go up to the Edit card. On a Mac, go up to the Photoshop menu. From there, choose Preferences and and then Full general:
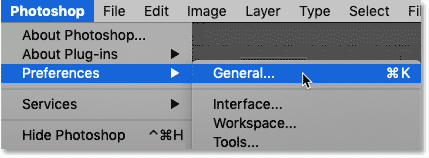
Opening Photoshop's General Preferences.
Skip Transform when Placing
To prevent Photoshop from opening Costless Transform every fourth dimension you place an paradigm, plow on the Skip Transform when Placing option:
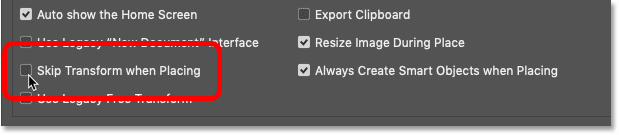
The "Skip Transform when Placing" option.
E'er Create Smart Objects when Placing
To cease Photoshop from automatically converting images into smart objects, turn off Always Create Smart Objects when Placing. You lot tin can ever catechumen a layer to smart object yourself when you demand to:
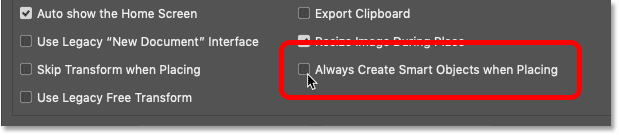
The "Always Create Smart Objects when Placing" option.
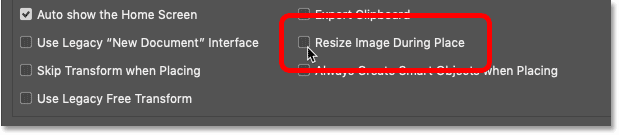
Resize Image During Place
And this tertiary option won't speed things up but it'south definitely worth looking at. By default, if you place an image into a certificate and the image is larger than the canvass size, Photoshop will automatically resize the epitome to fit the canvass. In other words, information technology will make your prototype smaller.
If that'south not what you want, and you would rather resize images yourself using Free Transform, and so uncheck Resize Image During Place. When y'all're washed, click OK to close the Preferences dialog box:
The "Resize Image During Identify" choice.
Bonus: Blending the layers to create a double exposure
So we've learned how to load multiple images at one time into a Photoshop certificate using the Load Files into Stack control, and how to add together more images using the Place Embedded control. I'll finish off this tutorial by chop-chop blending my three images together to create a simple double exposure event.
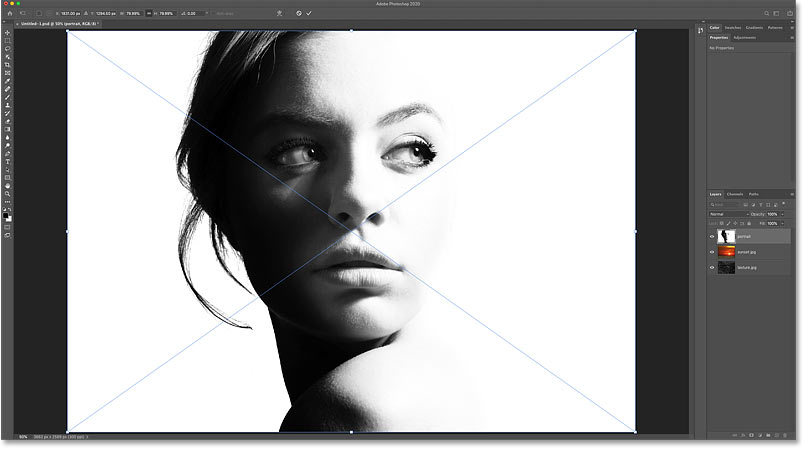
I'chiliad starting with my portrait image at the acme of the layer stack, which makes it the image that'south visible in the certificate:
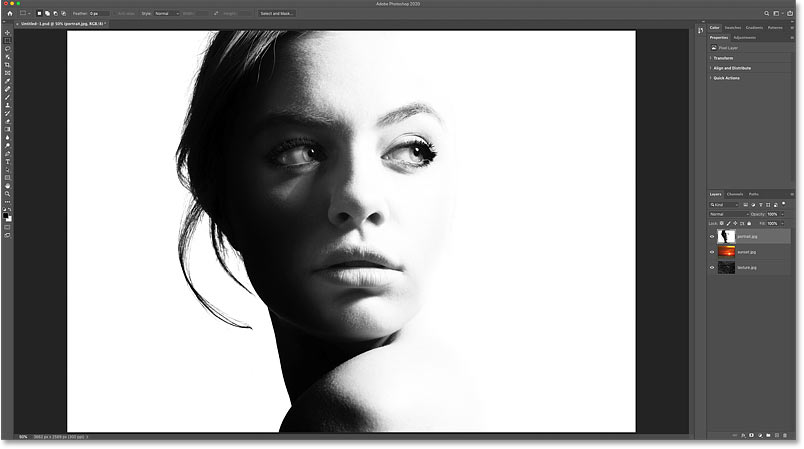
The portrait image. Credit: Adobe Stock.
Moving the sunset layer above the portrait
In the Layers panel, I'll click on my sunset layer and elevate it above the portrait layer:

Dragging the sunset higher up the portrait.
And now my sunset image is visible:
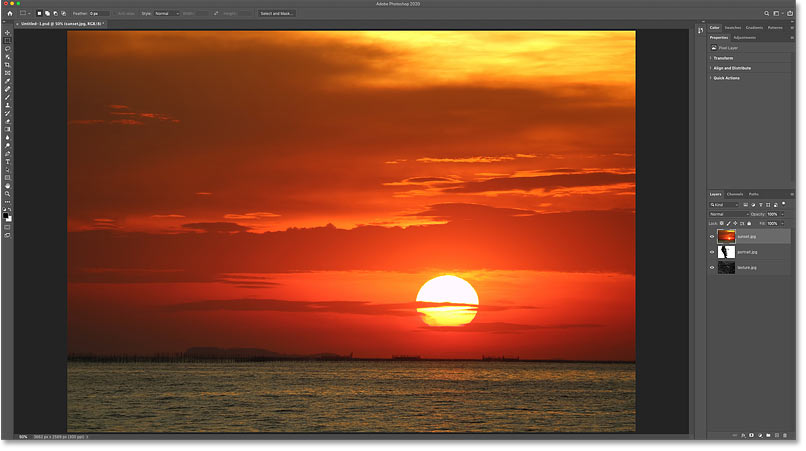
The sunset image. Credit: Adobe Stock.
Changing the blend mode
To blend the dusk in with the portrait, I'll change the blend fashion of the sunset layer from Normal to Screen:
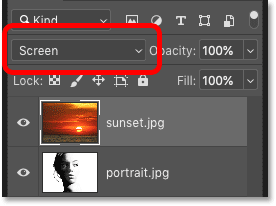
Changing the layer'southward blend fashion to Screen.
The Screen blend mode keeps the white areas of the portrait visible and reveals the sunset in the darker areas:
The upshot after changing the blend manner of the sunset layer to Screen.
Moving the texture layer in a higher place the dusk
Adjacent, I'll drag my texture layer above the sunset layer:
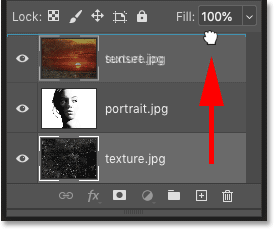
Dragging the texture layer to the acme of the stack.
And now the texture image is visible:
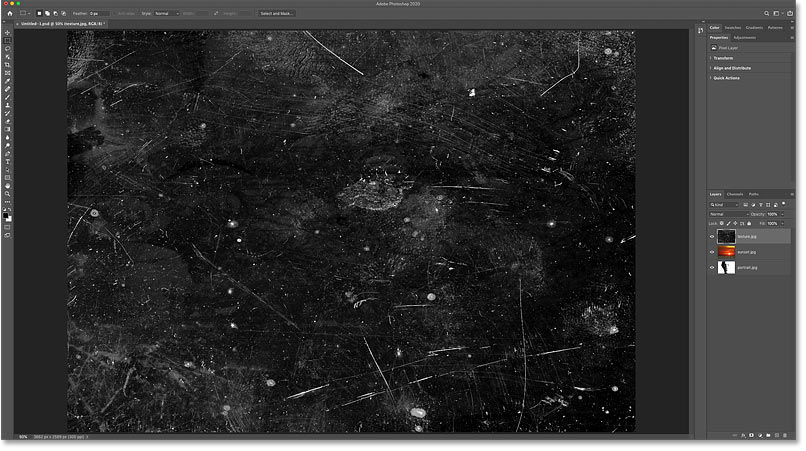
The texture image. Credit: Adobe Stock.
Changing the blend mode and layer opacity
To hide the dark areas of the texture and go on just the lighter areas, I'll modify its alloy mode to Screen.
I'll besides lower the layer'south Opacity down to around 70%:
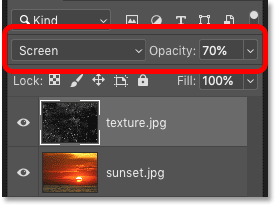
Changing the blend fashion and lowering the opacity of the texture.
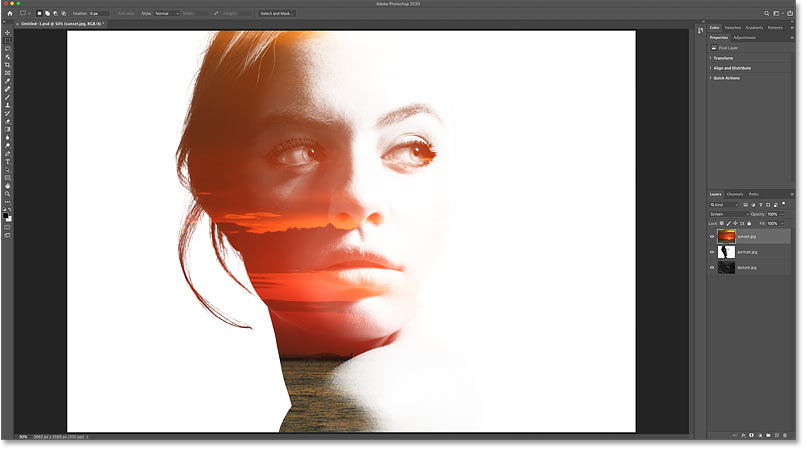
And here's the result with the texture at present blended into the effect:
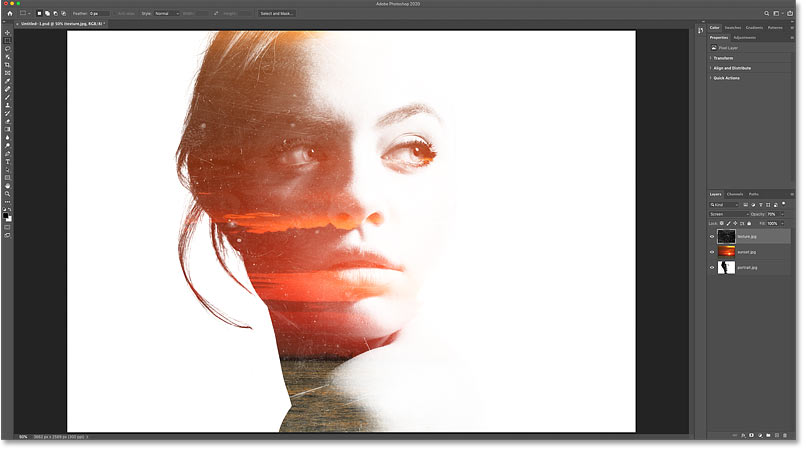
The result later on irresolute the alloy manner of the sunset layer to Screen.
Related: Learn three piece of cake ways to alloy images in Photoshop!
Merging the layers onto a new layer
Finally, to add a bit more than contrast to the effect, I'll merge all three layers onto a new layer above them by pressing Shift+Ctrl+Alt+Due east on a Windows PC, or Shift+Control+Option+E on a Mac:
Merging the existing layers onto a new layer.
Learn more than: The essential Photoshop layers power shortcuts!
Increasing the contrast
And then to increase the contrast, I'll go up to the Image menu and I'll choose Auto Contrast:
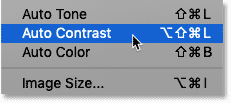
Going to Image > Auto Dissimilarity.
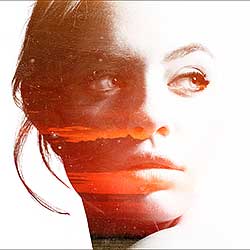
And here is my concluding effect:

The final double exposure effect.
And there nosotros have it! Cheque out my Layers Learning Guide to acquire more about layers, or our Photoshop Basics or Photo Effects section for more tutorials!
Other Stuff
© 2022 Photoshop Essentials.com.
For inspiration, not duplication.
Site blueprint by Steve Patterson.
Photoshop is a trademark of Adobe Systems Inc.
Source: https://www.photoshopessentials.com/basics/open-multiple-images-as-layers-in-photoshop/
Posted by: corneliusvartiou55.blogspot.com
0 Response to "How To Import Picture Photoshop"
Post a Comment