

How To Feather Product Photography In In Photoshop
The perceived value of your products and the trustworthiness of your brand are oftentimes judged based on the quality of your visual presentation. That means having high-end, beautiful production photography tin can go a long fashion.
However, non every online store possessor can afford to invest in a professional photography studio when they're but starting out. DIY product photography provides a great alternative, and as long as y'all know the proper tools and techniques, taking compelling product photos is well inside your grasp.

Shopify Academy Course: Product Photography
Photographer Jeff Delacruz shares how you can create your ain photograph studio and take beautiful product photos for less than $fifty.
Enroll for costless
What you need for the perfect product photography setup
- A camera
- A tripod
- A white groundwork
- White bounce cards fabricated of foam board
- A tabular array
- Tape
- The right room with a window
Showcasing your products in your online store with high-quality images tin can be the winning difference between a conversion and no sale at all.
From someone who takes products photographs everyday, this tutorial has been specifically crafted for business owners on a budget, and it'southward been designed to be simple, while producing excellent, professional product photography that gets results.
Let's explore each of the items yous'll demand for your product photography setup.
1. Camera

You don't demand a crazy full-frame DSLR camera organisation. While shooting images with a Nikon D810 (~$2K) sporting a 105-mm f/1.4 lens ($740) is awesome, it's also totally unnecessary.
Still, if you're feeling excited and have the upkeep to stretch for a new photographic camera system for this project, I suggest reading a post I wrote on Quora, which offers tips to help you choice out a proficient camera for product photography. If all you accept is your smartphone, that'southward OK too: check out this helpful guide to smartphone production photography.
When I did the test images for this, I started with my older model (2008), beat-to-hell Catechism G10 point-and-shoot. I love the Canon Chiliad series point-and-shoots considering they tin can go full manual and they shoot a actually prissy raw file. I picked this camera considering it's definitely not top of the line anymore, allowing me to demonstrate that, with even modest equipment, skilful results are attainable.
So what's the best camera for product photography? I would just kickoff out with any you lot accept handy and encounter what the results are. Information technology'south a common myth that it's the camera that takes the pictures. In reality, the photographic camera is simply one piece of the whole. A photograph is made upwards of a series of choices that incorporates lighting, exposure, styling, and post-processing decisions.
2. Tripod

Non to become too technical, but you're going to set up your photographic camera to a very pocket-size discontinuity and so you can have the nearly depth of field your camera is capable of.
The width of the depth of field defines the area of sharp focus, and to get to that you demand the largest f-end number your camera can obtain. Shutter speed and f-stop are related, and since a larger f-stop number like f/8 lets in less light, you'll need to counter that by using a slower shutter speed to allow more low-cal through.
When a camera has a slow shutter, you lot can't mitt concur information technology or the subject area volition be blurry—then a tripod is your answer. If you're interested in learning more about the fundamentals of photography, bank check out this video I did with Harrington College of Design. I realize that most point and shoots may not permit y'all to choose your f-stop. That'southward OK, and there are ways to get around this, which we'll discuss in the step past step.
Again, you shouldn't need to spend a whole lot of money on a tripod at this signal in your hazard, and there are many, many options out in that location that toll less than $30. I did a quick search on Amazon and found something that would work for $20.
3. White background
At that place are lots of options for a white groundwork, and if you lot're going to be shooting a lot, you may desire to get a white sweep from Amazon. I adopt a paper sweep because sweeps go dirty and you can cut off the muddied part and roll a new piece down.
A actually cheap option is to go to your local drug store or art store and buy some affiche board. I've seen it every bit low as $7 for 10 sheets. Remember to await for pure white, as off-white or cream will be more hard to make pure white.

4. White bounce cards made of foam board
When you're lighting with window lite, there will be a bright side where the lite is hit the product, and a shadow side. This shadow side will typically be too dark and so we utilise something white to reflect the light back into the shadows and brighten it up. Cream board makes a cracking bounce carte, because it's rigid and white.
Alternatively, y'all tin can employ black cream board to make the shadows deeper. This is particularly helpful if y'all're shooting a white product on a white groundwork. Adding black foam board to the sides, only outside of the photo behind the product volition create a night edge on the white product. Combine a white bounce card on the forepart and blackness bounciness cards behind the product for a more sophisticated lighting setup.
You tin buy foam boards on Amazon or at a local drugstore. Keep in mind, this is only a white card, and so you might be able to just balance a sheet of white printer paper or use a slice of poster board.
v. Tabular array
A standard folding table works best, and a width betwixt 24 and 27 inches is ideal.
6. Record
Depending on the table you terminate upwardly with, you tin can employ tape or clamps to secure down your lath so it sweeps properly.
7. The right room
A room with windows next to a wall is perfect, and the bigger the window, the more light you'll become in. Being closer to the window will create a softer light with darker, softer shadows. Being further away will give a more even light but with sharper, lighter shadows.
How to take professional product photos on a white background
- Gear up your table
- Fix your sweep
- Adjust your photographic camera
- Prepare your production
- Set up your reflector card
- Have the picture and evaluate
- Retouch your pictures
- Optimize images for your website
The visual appearance of products is a cardinal deciding factor for 93% of consumers. If customers tin sympathise and envision the products you lot sell, they'll experience more comfy giving you lot their money. Allow's get into the step-past- pace process for shooting your production photos.
Step 1: Set up your table

Once you have collected your gear together, it'southward time to set your shooting area. Place your table every bit close to the window as possible without intersecting the shadow from the windowsill. You'll want to start with the window 90 degrees to the right or left of your setup. The closer you are to the window and the larger the window, the softer the light will be.
Also, remember to plough off all other lights within the room you're shooting in, as other calorie-free will contaminate the set. This is very important and is the about common error.
You can attempt rotating the fix then the window is at a 45-degree angle to the set, or try it with the window straight onto the set for a dissimilar mode of natural lighting. Food photography is often shot with a window behind the setup and the camera shooting into the window for a more than dramatic effect. Another variation is setting up in a garage with the door open up—information technology will have the same qualities of light as a window, just without the glass.
You do not want directly sunlight hitting your set. Straight sunlight is harsh and looks bad on most people and products.

Stride 2: Set your sweep
There are a lot of ways to do this, but the ultimate goal is to take your mat board sweep from being flat on your table to being vertical. You may need to whorl up the board to help it achieve that shape.
In my setup, we placed the table against the wall and taped the sweep to the wall and the table. If you don't have a wall, you're going to have to brand something to secure the back of the sweep to. Some bricks or a wooden block would work well.
Place your product in the center on the flat part of the sweep and leave enough room to sneak your white reflector menu in later on. In this instance, our production is a cool Skyrim and Doom toy available from Symbiote Studios. Thanks, guys!
Step 3: Accommodate your camera
Every camera is a little dissimilar. Some cameras are fully auto and some have the ability to brand adjustments. The beauty of this The Window Light setup is that you can set up all photographic camera settings to motorcar if you must and it will work.

one. Set up Your white residual (WB) to Auto.
ii. Turn your wink setting to Off.
3. Set your image settings to the highest quality. Nearly point-and-shoot cameras don't have a raw setting, but if yours does, utilise it. Raw is the largest file a camera tin shoot and utilizes the full bit depth of the photographic camera. You will take to edit in software that reads raw imagery though, such as Photoshop, Span, Lightroom, or Discontinuity.
If you lot don't have a raw setting, set it to the largest JPG setting yous have. On my Canon at that place are two settings to expect out for:
- Size. Sometimes L (Large), Thou (Medium), or S (Minor). Pick Large. This setting determines the file size, and you almost e'er desire to shoot it at the largest size for optimal image quality. Yous tin can always shrink an image once information technology is taken, but you can't make it larger.
- Quality. S (Superfine), F (Fine), North (Normal). You should ever set it to Superfine. This setting determines the number of pixels that are used on the camera sensor. Not using all the available pixels will render a lower quality prototype.
Set up your ISO to 100. The ISO controls the sensitivity of the sensor. The higher the ISO the more racket there is. Typically, the everyman ISO yous can gear up your camera to is ISO 100, then set it in that location if you tin.
Exposure settings

Option A: Set your camera to Manual (Yard)
This is the best setting for this type of work because cipher will be moving or changing every bit you take your pictures. In manual, change your f-end to the highest number, which volition give you the greatest depth of field.
Preview the image on the dorsum of the camera through liveview. Everything is probably pretty night, which is OK. Now, switch to your shutter speed and rotate the dial to make it bright enough that the image is properly exposed. Your shutter number should be going up. For example, your number may go from 1/60th to ¼ . These are fractions of a second that your shutter volition exist open for, and as the number lowers it volition let more than light in. Adjust this number until the preview of the prototype is right.
Option B: Apply Aperture Priority (AV)
Your camera may not take this either, but if it does, change the f-cease to the highest number. This should automatically conform the shutter to exist what the photographic camera thinks it should be. This may exist incorrect, and you may demand to utilise the exposure compensation dial to add low-cal.
Option C: Auto Exposure
If you're stuck in the all-auto world, at that place may not be much you tin do. Don't fret, it'south not a big deal. If y'all have an exposure compensation dial, y'all will nearly likely demand to add +1 or +1½ to get the correct exposure. If all you lot have is the running man images to cull from, try picking something like Sunset. With the iPhone, just tap the area you want exposed properly.
Employ the histogram on the back of the camera. You're looking for the gradient to be closer to the right mitt side, like in the image above.
💡Exposure Tip: Don't trust the image on the dorsum of the camera. Instead, pay attention to the histogram to know if your exposure is right. The far right hand side is white, and left is black. In the example image there is a trivial gap on the right hand side, which ways that in that location is no pure white. Arrange the exposure till the part of the curve representing the white background is touching the right border without going over. In this example, you would probably need to add 1/3 of a cease, or one click, for more than light.

Zoom In
Cameras typically accept an optical zoom and a digital zoom. Don't use the digital zoom, every bit this volition lower the quality of the image—information technology'due south substantially just cropping the digital image. If you have an optical zoom, try zooming in equally far every bit yous can without using the digital zoom. A longer zoom volition remove distortion acquired by a broad angle lens. Cellphones have a very broad angle lens, which is a common event.
Step 4: Set upwards your product
Setting up your product is one of those things that seems simple merely can take time to position correctly. If it's a bottle, pay attending to keeping the label type centered. Many times there are lots of tiny movements needed to get everything lining up perfectly.
Step 5: Gear up the reflector card
This unproblematic white carte is the single most important light modifier we accept in our photo studio, and we use it with everything. The light will bounciness off the card and make full in all the shadows. How y'all position this card is a matter of gustation, so try it at dissimilar angles to the product.
Pace 6: Accept the picture show and evaluate
Once you have the picture, take some fourth dimension and actually expect at what y'all've created. This is where experience and instruction come into play—what'south working, what isn't working, and what tin you do to make it amend. Experiment with dissimilar ways of making your paradigm improve, and over time your skills volition amend naturally.
Upload your images onto your figurer to get a better idea of how they look. The back of your camera is never very authentic. I suggest using Adobe Lightroom to organize all your images. Information technology can exist used to practise about all of your editing except very advanced processes. You'll no doubt need to make some adjustments to the images to get them to look right.
Post-production software like Adobe Lightroom is very in-depth, and we don't have time to go into the details of using information technology.


Step 7: Retouch your pictures
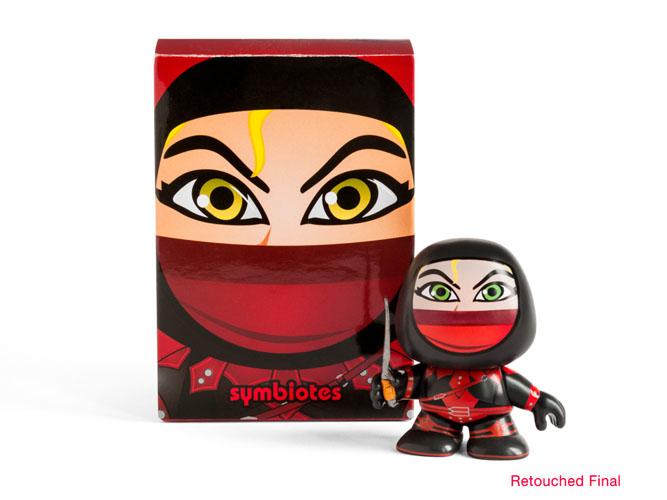
Once you've got a final image you're happy with, information technology's fourth dimension to get it retouched. If you photographed your production correctly, the product should exist exposed properly and your background a calorie-free grey. It should await something similar the un-retouched paradigm above, and comparison it to the retouched version shows you how important this step of the process really is.
The retouching tasks associated with on-white photography, for someone without a lot of training, can exist tricky, and tend to be the weak link for most people trying to photo products themselves. Then, instead of trying to teach you lot advanced Photoshop, I'm going to show you how to outsource it.
You lot'd be surprised how affordable this tin can be. From around $3–$five an image, you lot can have a professional person retouching visitor ameliorate your images for yous.
Finding a skilful company can exist tough, only i visitor that works well for consumers, in my opinion, is Pixelz. Its software allows y'all to upload and manage your retouching from kickoff to finish. Pricing starts at $1.45 per image, with a $25 minimum, but you lot get three free test photos.

Step 8: Optimize images for your website
Search engine optimization (SEO) is crucial for all online sellers. 1 thing that is important is the load speed of your ecommerce website, and big images tin actually be a burden on this. In that location is a fragile rest between image quality and optimization, considering if you lot over optimize, it destroys the paradigm. As a rule of thumb, I endeavor to make my images no larger than 200 KB, but shoot for the smallest image I can.
Resize your image for the container
The first way to optimize your image is to resize the acme and width of the image. When you await at an prototype on a webpage you are actually looking at an HTML container with an image dynamically scaled to fit inside information technology. If the container on my website is a 648 px foursquare and the actual prototype is 1500 px square, it will be displayed at 648 px, just the epitome it'southward referencing volition even so load at 1500 px. That's a lot of actress load time, specially if you take many images.
i. Figure out the HTML container size

You want to resize the actual epitome to fit the container before y'all upload it to your website. I normally resize my images 1.5x larger than the container so information technology looks good on a retina screen, which in this example would be 972 px square.
To observe the prototype container size, you will need to access your spider web browser's Developer tools. Right click on the prototype and choose Inspect Chemical element. On the sidebar information technology will show the pixel dimension of the container.
two. Resize the paradigm
At that place are many gratis tools to help you resize your epitome. I recommend using Mac Preview or Microsoft Moving picture considering they're built in and like shooting fish in a barrel to use.


After yous've re-sized the image, export it and save it to the desktop as a jpeg at 100%.
three. Compress the epitome
One time you've saved the image at 100% quality in preview, you'll notice that the file size is actually fairly big. This is because we don't desire Preview to shrink the prototype, considering we tin't see the results of moving the jpeg Compression slider. When we compress an prototype it actually removes data that's not beingness used—compress it too much and the image starts to fall apart and it looks blotchy.
Then instead, we want to compress the image smartly. In the past I used to recommend Adobe Photoshop's Salvage For Web function, because as you lot lower the slider you get a preview. Recently, I discovered a software chosen JPEGmini that uses an algorithm to determine the best compression for your paradigm. Later on running a couple yard images through information technology, I'm impressed with how quick and easy information technology is.
Summary Recommendations
- Image size: ~one to 1.5x the HTML container the image is in
- Format: jpeg
- Colorspace: srgb
- Pinch: compressed using JPEGmini after export.
Gratis Guide: DIY Product Photography
Larn how to have beautiful product photos on a budget with our free, comprehensive video guide.
Get our DIY Guide to Beautiful Product Photography delivered right to your inbox.
Almost there: please enter your e-mail below to gain instant admission.
We'll also send you lot updates on new educational guides and success stories from the Shopify newsletter. Nosotros hate SPAM and promise to go along your email address safe.
Product photography tips
Did you know that 22% of returns happen because a production looks dissimilar in person than in photos? It's clear that high-quality images tin can not merely increment revenue just likewise save yous money on returns. Let'due south look at a few tips to keep in mind when taking production photos.
Use window light vs. lightbox
The number one question I get is, Should I go a lightbox? Window calorie-free is like shooting fish in a barrel because it is a one-light setup, plus it is inexpensive and easy to practice. When shooting with a light tent, you enter into a multi-lite setup, which adds a level of complexity, commonly requiring education beyond a simple article.
Multi-light setups introduce the following issues:
- Y'all have to buy lots of extra gear, which can get expensive. The cost of the lightbox and lighting can add together upwardly, perhaps costing more than than hiring a professional.
- You'll need to understand how to rest the exposure of the different lights and how to position them properly. Learning how f-stops and shutter speeds work in relation to lights tin can exist challenging.
- Colour balancing lights become a concern, as each low-cal source has a different color, which is called color temperature. Extreme color can greatly affect your image.
- If you decide to use flash instead of continuous light, be prepared for a challenge beyond basic exposure. Flash exposure is determined past f-terminate but, has limits on sync speed, and requires special equipment to trigger.
- The quality of light from a calorie-free tent is very even and oftentimes shadowless. Shadows are important because they create the shape of a product and provide a sense of place. It is my personal opinion that the image resulting from window light is more dynamic and interesting than a calorie-free tent.
If you even so find yourself wanting to purchase or build a light tent, be prepared to learn how f-stops, shutter speeds, ISO, and colour balance are set on the camera and with individual lights.
Limitations with this setup

DIY window light setup vs. professional studio.
One issue people take with this setup is that their photos don't look perfect. For example, some people have struggled with reflective products using this method because information technology reflects the background backside the photographic camera, similar in the examples beneath.

Only a professional on an advanced set tin accomplish perfect results.
Like anything, there are limitations to DIY without getting serious with education and investing in professional equipment. Most people can shoot great photos in a single-light shooting environment, like with the natural window calorie-free strategies discussed to a higher place. However, to photo difficult products similar clear and reflective products perfectly requires a multi-low-cal studio setup and a deep technical knowledge of photography.
Learn bones photograph editing techniques
Once you've got the hang of taking astonishing product photography, it makes sense to learn photo editing to polish upwardly your images. It'll save you coin because you won't take to pay for a service or professional person editor. And it gives you complete control over the wait and style of your final image.
A practiced place to start would exist Adobe Photoshop Tutorials. It has an emphasis on using Adobe products, but the lessons are easy to understand and you can utilize them beyond using Adobe Photoshop.

After you lot acquire the basics, choose a photograph editing software for retouching your photos. This will help you prepare them for publishing on your website. You tin also apply a tool like Taler to make ads and social media content with your product photos. It offers tons of filters, overlays, and other editing features to create branded images for your marketing campaigns.
Shoot multiple angles
The point of shooting multiple angles is that it's a change for shoppers to come across products from different perspectives. Some shoppers may prefer shut-upwards shots. Others may want to see items directly on. Everyone can envision themselves using your production in different ways, which can pb to more sales.
Some camera angles to try are:
- Eye level, which shows your product as you'd see information technology straight on
- High angle, which shows your product every bit if y'all're looking down as it
- Depression angle, which shows your product as if yous're looking upward at it
- Bird'due south center, which shows your production as if you're standing higher up it

Make sure to proceed your photographic camera and tripod in the same position during your shoot. Rotate the product if y'all desire to modify angles. If you lot rotate the product only, your final shots volition take the same frame upshot. This ensures consistency and reduces image editing later on your photoshoot.
Endeavour other types of product photography
You may want to effort dissimilar types of product shots besides on the white background. There are many options bachelor to you once you're comfy behind the camera. Let'due south look at a few.
Lifestyle. Lifestyle shots help tell the story behind your product. They piece of work for website content, just you tin also use them for social media, weblog posts, emails, and other channels to attract new customers.
Notice how Allbirds uses both white background and lifestyle photos on its product pages.
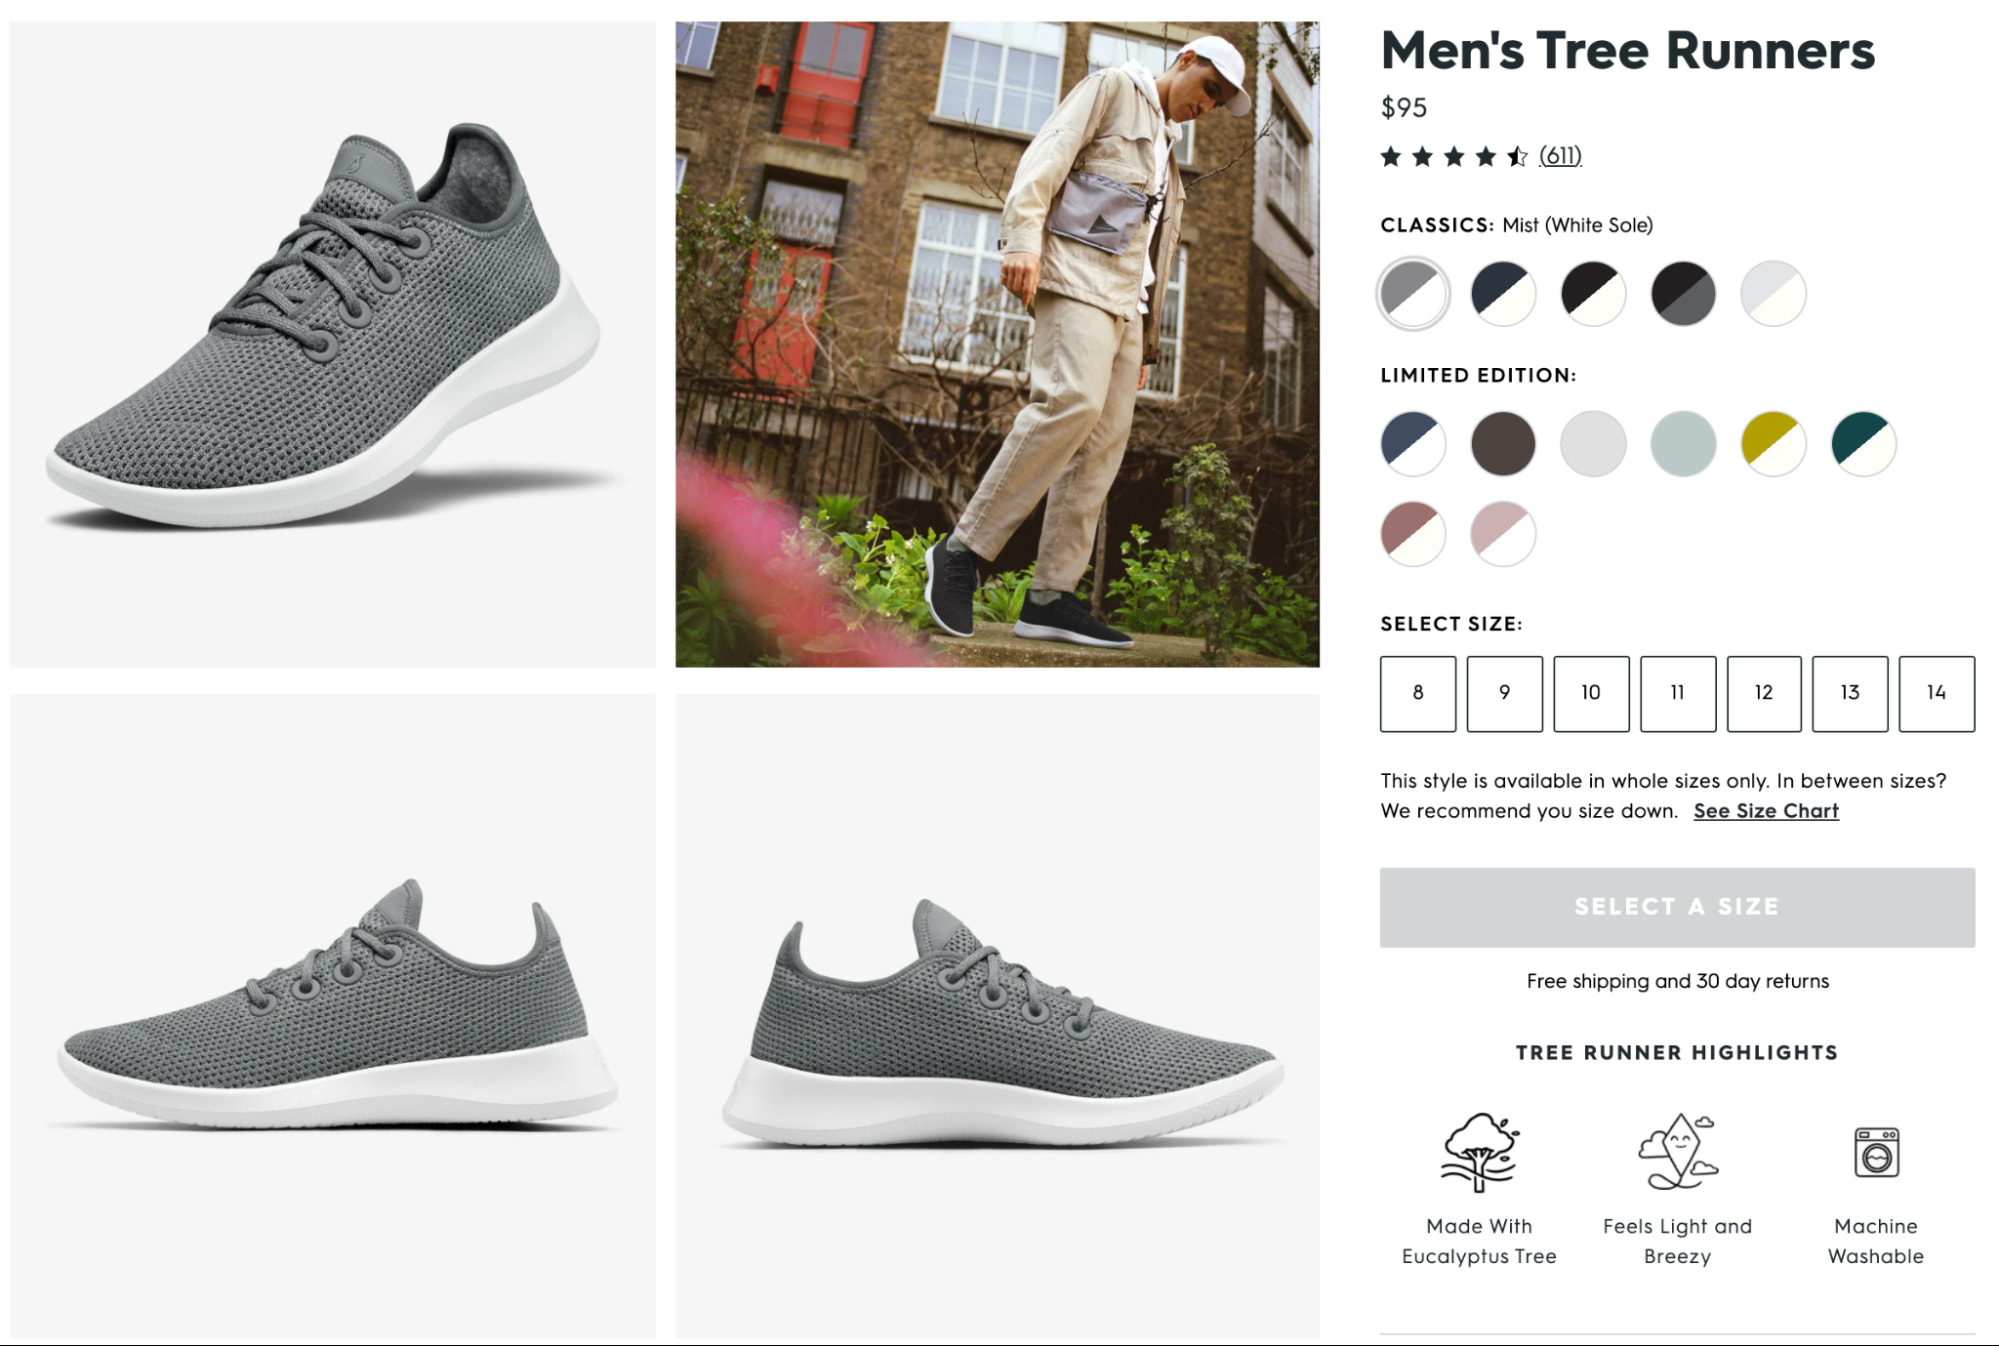
This gives shoppers context for where and how people actually use its products. If you sell hiking boots, you can show a scene of them on someone's anxiety out on a beautiful hike. If you're selling clothing, y'all might prove your dress on someone walking around town or at a classy event, depending on what you sell.
Detailed. Detailed images give shoppers a closer expect at specific product features. Leather retailer hardgraft uses detailed shots to evidence zippers, handles, and other unique features of its goods on its product pages.

Group. These shots evidence products grouped together. Yous'll want to use this way when offering kits. It's a mutual tactic brands like Beardbrand use to showcase the variety of products offered in their bundles.

Hire help
If you lot've reached your limitations, y'all may want to consider hiring a professional lensman instead. The average price of getting a professional white background photo is around $thirty–$40 per photo, and there are many options online. This could exist a worthwhile investment, as better photos do sell more products online. Start past running a Google search for local product photography services.
Write bully product descriptions
Lastly, make sure to write peachy product descriptions. Production photos and descriptions work together to assist customers understand your products. They also help influence purchasing decisions to increase sales for your ecommerce shop.
Your goal is to give as much data as possible then people are compelled to buy. New entrepreneurs frequently overlook product descriptions. Simply they are the courage of a high-converting products page—along with beautiful photos, of course.
Learn more than about product descriptions by reading 9 Ways to Write Product Descriptions that Inform and Persuade Your Customers.

Free Reading List: Copywriting Tactics for Entrepreneurs
Is your website content costing y'all sales? Acquire how to improve your website copy with our free, curated list of loftier-impact articles.

Become our Copywriting Tactics reading list delivered right to your inbox.
Almost there: please enter your email below to gain instant access.
We'll also transport you updates on new educational guides and success stories from the Shopify newsletter. We hate SPAM and promise to continue your email address safe.
Using your production photos
The best ecommerce sites have one affair in common: beautiful product photos. When yous're but starting out, getting your product images shot can be an intimidating prospect, because good ecommerce photography can be expensive. But at that place are hundreds of product photography tools to assist y'all become the chore washed yourself. Past following this DIY product photography tutorial, you lot too can produce amazing images for your website. As y'all become more comfortable behind the camera, you can branch out into different types of photography. You tin get equally artistic equally you want!
The best role? You'll accept total control over how yous build your make and showcase your products online. Done well, you'll increase sales and conversions on your website and grow a successful online business. Maybe one day you'll even sell your own photos online as a new side gig!
Analogy by Gracia Lam
Ready to create your business organization? Start your free xiv-day trial of Shopify—no credit card required.
Product photography FAQ
What is product photography?
Product photography refers to using specific photography techniques to have authentic and attractive photos of your products. Your production photos influence shoppers' purchasing decisions, which can increase conversion rates and sales for your business.
What do yous need for a production photography setup?
- A camera
- A tripod
- A white background
- White bounce cards
- A table
- Tape
- The right room with window lighting
How can I shoot product photography at abode?
- Invest in gear and equipment
- Set upwards your product photography studio
- Have your product shots
- White bounce cards
- Edit your photos online
- Add them to your website
How do you shoot production photos?
- Set upward your tabular array
- Build your sweep
- Adjust your camera
- Gear up upwards your production
- Gear up the reflector card
- Accept the picture and evaluate
- Retouch your pictures
- Optimize images for your website
Source: https://www.shopify.co.id/blog/12206313-the-ultimate-diy-guide-to-beautiful-product-photography
Posted by: corneliusvartiou55.blogspot.com
0 Response to "How To Feather Product Photography In In Photoshop"
Post a Comment